Mix all ingredients at once when about to fry. Heat up tawa with some oil. Spread half of the pancake batter into a round shape. Fry till golden brown and flip over. Remove to plate after both sides turn crispy golden brown. Spread okonomiyaki sauce with spoon. Drizzle mayo. Cut seasoned nori on top. Serve.
NOTE
Once cabbage is added to batter, it will secrete liquid. So, cook immediately after mixing all ingredients together.
Yesterday, I decided to make my own Udon noodle. I have always loved eating Udon because of its starchy wheat taste. Ha - All the carbohydrate - yeah.
I viewed some videos on Youtube regarding how to make homemade Udon. It's fairly simple and seriously, easier than what I thought. I have tried kneading dough before and I hate it. It requires a lot of strength and I simply do not have enough. Kneading dough is supposed to be the man's job. = /
Homemade Udon
** This recipe is for 2 servings.
Ingredients
200g wheat flour (ordinary flour)
9g (1 teaspoon approximately) salt
90ml water
Utensils
Knife
Bowl/big container
Clean plastic bag
Sieve
Rolling pin
Steps
Sift flour and place it in the bowl.
Put in salt.
Pour in the water. It's important to use this much of water. No more and no less.
Knead well into a dough.
Place the dough into the plastic bag and stomp your feet on top. Seriously, this is the very traditional method used by the Japanese family. Try it. It's not that dirty after all if you have clean legs and plastic covered your dough. The reason why you should use your leg instead of your hand is because your leg gives more strength and it makes the dough ready quicker.
Flatten the dough and roll it flat with your rolling pin until you get your desired thickness of dough.
Fold the dough so that it's easier to cut uniformly.
Cut your dough.
Sprinkle some flour as you roll the dough to ensure that the surfaces do not stick to one another.
Let's see the photos which I took step-by-step for tutorial purpose.
Basically these are the ingredients that you need.
It is just that easy and easily available in your kitchen.
Sieve flour, add in salt then mix well so that there is no salt clumps in your dough later.
Pour in water and knead well in a dough.
Place it in the plastic bag to be ready to be stomped on -
I didn't capture this scene as not to frighten people.
If you can see how fine the flour has become after it has undergone stomping effect.
Haha - it's seriously good and fast.
That is how you should roll your dough with your rolling pin.
Remember to sprinkle flour on your working table and dough as you roll it.
Remember not to tear off the dough as you roll.
Dust your knife with some flour which probably will be handy for you to cut the dough later.
Fold your dough into multiple layers like what I did.
Some people preferred to roll the dough so that it becomes a rod shape.
You decide what you like the most. It doesn't really matter.
Cut the dough into stripes.
The thickness is totally up to you.
I like thick noodles.
I cut mine about half an inch thick.
Hmm, here's to show you clearer how I fold the dough.
Also, take note of how long I've rolled the dough into -
It's longer than my rolling pin - sort of double its length uh huh?
Lastly, remember to eat your noodle when it is fresh.
Homemade noodle cannot be kept long.
I kept another half of mine in the refrigerator.
It became a little hard but not too bad, still edible and fresh; but not as good as the first day's.
So, have fun!
Taste wise, it tastes like mian fen gao - Haha -
but the process is what made it fun and worth doing.
My mood will automatically switch to good whenever I am in the kitchen. Ha-ha-ha. I simply love cooking. My future kitchen must be well equipped with all the tools. Also, the refrigerator must have the food I need.
This is my first attempt making bento-- Well, it obviously doesn't look very good because I only have:
I have been wanting to make this ever since I saw the recipe at somewhere else that day. I couldn't remember where I got it-- I jotted the recipe on a piece of rough paper and kept it at a corner. As I was not feeling too well last week, I dare not to cook anything too oily. I am feeling better now and here you go - Dorayaki!
It's best known as 銅鑼焼き or Doraemon's cake/cookie/biscuit.
. . . . .
D-O-R-A-YA-KI!
Dorayaki Recipe
Servings: Can make about 10 Dorayaki using this recipe.
60 gm fine white sugar (grind the sugar into powder if you only have granulated sugar at home)
2 tablespoons of honey (I used pure honey)
1/2 tablespoon of cooking oil (I used Canola cooking oil)
1/2 tea spoon of vanilla extract essence
1 tablespoon of milk (I used Nestle full cream milk) *optional*
Tools:
Non-stick frying pan
Electric mixer / whisk
Spoons
Big bowl
Chinese soup-drinking spoon
Steps:
Use the electric mixer to beat eggs and sugar until the mixture turns light and fluffy (in BM: kembang). I used high speed and beat the mixture for about 10 minutes.
Put the electric mixer a side. You won't need it anymore. Then, put in honey, oil and vanilla extract into the egg-sugar mixture. Stir well using a spoon.
Put in baking soda and flour into the mixture. Use scoop and push method (in BM: kaup balik).
If your batter is too thick, you can put in some milk. In my case, I put about 1 tablespoon of milk.
Get your non-stick frying pan on the stove with low fire. *very important: do not use high fire*
Use the Chinese soup-drinking spoon as a rough measurement to scoop the batter and put it into the frying pan to cook.
Flip the round Dorayaki only when you notice there's some bubble-liked texture on the Dorayaki surface which is facing you. This is an indicator that it's time to flip over. See images below for better understanding.
Serve with Nutella chocolate paste or other paste while it's hot. Dorayaki is done. =)
Reminders:
Do not try to skip the first step - beat the egg and sugar using electric mixer until the mixture turns fluffy. It will affect the overall taste of the Dorayaki.
Do not put oil in the pan while you are cooking the Dorayaki. They already contain oil. You will have really oily Dorayaki if you put more oil to cook them.
Do not ever use high fire. Use really low fire and cook them slowly. Be patient.
Flip over the Dorayaki only when you see bubble-liked texture on its surface.
Don't make your batter too thick/watery. Get a moderate consistency.
Do not use granulated course sugar to beat with the eggs. I am afraid you will be able to bite the sugar in the Dorayaki. It is not going to taste good. Grind your sugar if you don't have fine sugar.
Images Taken During The Process of Making Dorayaki:
I forget to put in the vanilla extract.
Basically, those are the needed stuff to make Dorayaki.
You can easily find these materials at home.
It's a mistake.
I should have pour the eggs and powdered sugar into the rice cooker pot.
I posted this image to show the first step: sugar + egg
Beat the egg and sugar with an electric mixer.
After beating the mixture for about 10 minutes, this is what you'll see -
Light and fluffy mixture.
Put in honey, oil and vanilla.
Then, use a spoon to mix the mixture well.
Put in baking soda and flour.
Mix well using a spoon.
This is how your batter should look like after mixing everything together.
The consistency of the batter should not be too thick, or else your Dorayaki will taste very hard.
But, you can't make it too watery too.
Just get a moderate-consistency will do.
I did add little bit of milk into my batter.
Frying pan with low fire.
Remember, do not use high fire.
You don't have to prior heat up the pan before cooking.
Make sure, your fire is really low or else you will burn your Dorayaki.
And 1 more thing: you DO NOT have to put any oil on the pan before cooking them.
These are the first 3 round Dorayaki that I placed in the pan.
I dare not put many at first because I want to make sure all things are right.
To make round shape, all you need to do is just pour the batter at the center--
It'll spread into a circle shape if the consistency is right.
You can adjust it slightly using your spatula if you find the shape isn't looking too good.
So you see, my non-stick pan has some problem lately.
I have some problem flipping them over.
Thus, you can see some dented area at the corner of each Dorayaki.
However, I slowly pick up the technique when I continue making more.
Tips:Usually, the first batch of every stuff will not look too good. =)
This is the hint I talked about earlier.
Notice there's bubble liked texture on the surface?
This is an indicator to tell that the other surface of the Dorayaki is cooked and it's time to flip over.
See...?
This is its back.
It's cooked in beautiful beige-brown colour.
To me, beautifully cooked means beige/light brown and not dark brown---
Dark brown colour looks like chao-da (over-burnt) to me.
These are the 3 Dorayaki with the best look.
Some were eaten by Dad when I'm cooking them.
Eat with Nutella chocolate paste.
It tastes great!
I just wanted to show how the Dorayaki looks like when you put 2 together with paste at the center.
Always wanted to make sushi but never succeed because I always fail to roll the sushi the way they are supposed to. Another reason that fails me all these while is the thought of using cheap materials. So, the conclusion is:
To make good sushi with good look + taste, you need to have:
Proper tools
Japanese rice
Rice vinegar
Patience
Making sushi is not my first attempt because I have tried it several times. I gave up, disappointingly each time when the sushi doesn't turn out to look and taste the way I wanted it to be. Hence, here's a piece of advice to you guys who plan to make sushi on your own.
Reminders:
Do not attempt to use ordinary rice instead of the Japanese rice just because you want to save cost. Trust me, the result of using Japanese rice is very much different compared to ordinary rice. You just won't make it, using ordinary rice.
Do not ever forget about the rice vinegar, which is one of the main things for the seasoned rice. You will end up getting plain and tasteless rice if you were to ignore the importance of rice vinegar. I have tried several ways to get rid of the rice vinegar - substitution with ordinary vinegar (proven, failed).
Try to get a tool which you are comfortable with. For me, the bamboo mat is seriously a waste of money because I seriously fail at rolling. I find it so difficult and troublesome - to wrap the bamboo mat with plastic before putting the nori sheet and roll the sushi. It's too hassle to do this every time when I wanna make sushi. I don't have that much plastic anyway. I would prefer to have a tool, which is more user friendly. Thus, I bought this: 3-Steps Sushi Roller. It really makes everything easy for me.
Product's Name: 3-Steps Sushi Roller
It's also known as: Leifheit Perfect Roll (Not sure if the one I purchased is the same brand but it definitely works as well as this)
Complementary Items: 3 Months Warranty + 1 English version recipe tips
Overall Rating: 9.5/10
Video taken from Youtube for demonstration on how to use the Leifheit Perfect Roll
----
Below is a process that I'd like to share of me using the 3-Steps Sushi Roller that I bought from Mydeal. Making sushi requires the following essential items:
SushiMaking
Materials:
Rice:
Japanese rice
Rice vinegar / Grain vinegar (I bought grain vinegar)
Filings:
[Can be anything: As-your-wish]
I picked:
Crab sticks
Hot dogs
Eggs
Japanese cucumber
Shrimps
Ebiko (bought it at supermarket for RM 13 per packet)
Nori sheets (seaweed)
Tools:
Sharp knife
Any Sushi Maker tool (I am using 3-Steps Sushi Roller) or the traditional way: bamboo mat
A long glass filled with water to moisture your knife
A clean table cloth to wipe away the rice residue after you cut the sushi
Methods:
RICE:
1) Wash and rinse the Japanese rice and cook the rice with sufficient water with your rice cooker. Just like how you cook ordinary rice.
2) Once the rice is cooked, get a spatula to scrape the rice. If you cook 1 rice of Japanese rice, I suggest you put at least 3 tablespoons of rice vinegar. That is the ratio which I find it most accurate so far. 1:3
3) Mix the rice and rice vinegar well using the spatula. Put on the rice cooker lid after that, to avoid the rice from becoming too dry.
FILINGS:
1) Cut the materials in stripes form so that it's easy to be inserted in the sushi later.
ROLLING PROCEDURES:
1) Cut the Nori sheet based on the Sushi Roller's white sheet. Basically, you can get 3 stripes from 1 piece of Nori sheet.
2) Place one of the already cut Nori sheets on the Sushi Roller.
3) Spread some rice using the spatula/spoon. 1 tablespoon of rice is more than enough. Do not be greedy.
4) Put the filing materials on top of the rice.
5) Then, put on another tablespoon of rice on top of the filings. Do not have to worry whether the rice covers the filing ingredients properly or not because that will not affect how your sushi looks like after that. That is one of the most magnificent benefits of this Sushi Roller.
6) Roll. See images/video for better understanding. Difficult to explain using words.
7) Ta-dah. Cut and serve.
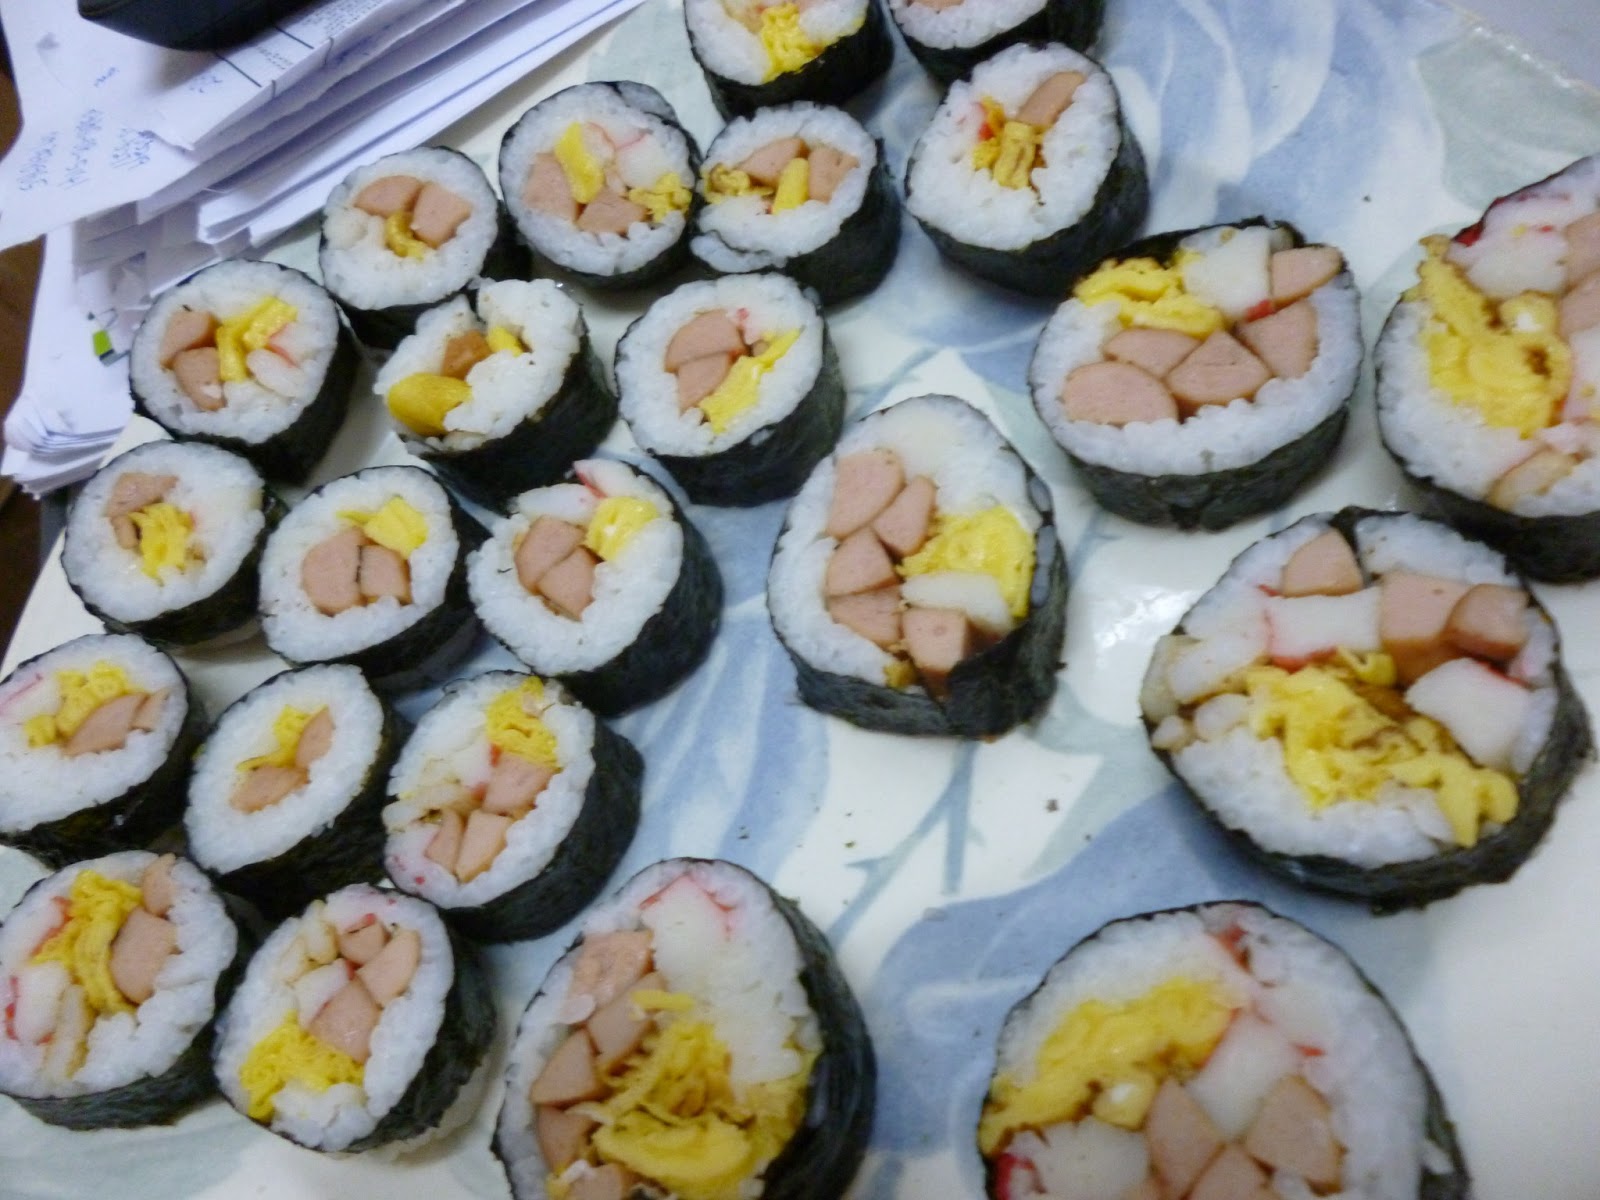
*NOTE: The pictures were taken during my first attempt of using this device. Practice makes perfect. My sushi turns out to have better appearance after my 3rd attempts (see the sushi picture above)
Trace and cut the Nori sheet according to the width of the white sheet from the Sushi Roller.
Spread Nori sheet on the white sheet Sushi Roller.
Spread 1 tablespoon of rice on the Nori sheet.
Put your filing ingredients on top of the rice.
Spread another 1 tablespoon of rice on top of the ingredients.
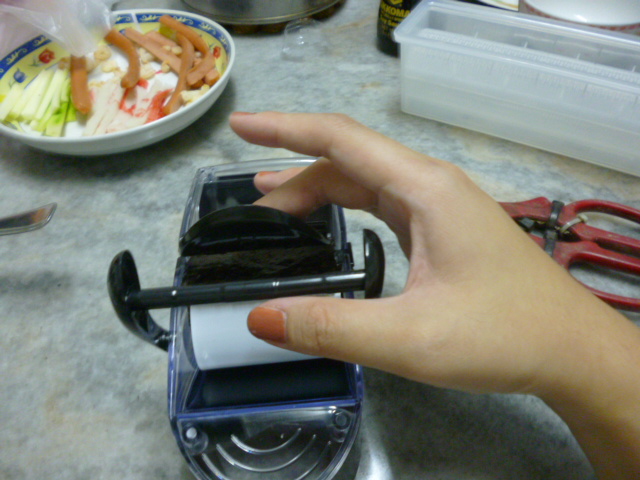
Pull the left hand side holder to the center, like what is shown in the picture above.
There's a hole at the middle where it allows the end of the holder to clip onto it to stay stationery.
Pull over the right hand side holder to be on top of the left hand side holder.
Then, used the left hand side stationery clipper to fix the position of the two holders.
I hope that the picture is able to explain better.
Basically, you will know how it works if you try to experiment with it for 5 minutes before starting the work.
It's really easy to use and I believe anybody will understand how to use it, even without manuals.
Basically, this is how it will look like after the stationery clipper is used to hold the two holding clippers.
And then, notice I am putting one of the holders (initially the right hand side holder).
I need to snap the photo, thus, I'm using one hand.
Supposedly, you should use two hands when you do this.
One hand is supposed to hold the stationery clipper whereas another hand should hold the right holder-
and pull.
As you can see, one hand is pulling whereas another hand is used to stationary all the clippers/holders.
Notice the shape of the sushi through the transparent plastic.
Usually, on the first attempt, you don't have to pull really very hard.
The first pull is usually to give the sushi roughly a rod shape.
It doesn't need to be definite yet because we still need to adjust its shape to look perfect.
Pull it until you think you are satisfied with the rod shape.
After the first pulling attempt, your sushi will look like this when you release the stationary holder.
As you can see, part of the end of the sushi is still not rolled up.
This is one of the complains that I see everybody is posting about this device.
However, I don't think it is a problem at all because it can be solved by simply adjusting the sushi roll that you have made..
All you need to do now is just to open up the holders--
And try to adjust the shape of the sushi roll.
As you can see, I am trying to roll the sushi manually, IN THE sushi roller itself.
Why am I doing it inside instead of outside?
Because the sushi roller has a definite width shape and it will prevent the filings from dropping out.
All I need to do is just slowly adjust and roll the sushi manually.
This is how it will look like after a quick manual roll up.
It does not need to be tight looking because I used the manual way to roll it in the Sushi Roller.
It will look loosen up--
And then, repeat the steps that we have made earlier.
Put the left hand side holder to the center.
Then, the right hand side holder, followed up by the stationary clipper.
Give your sushi 1 last roll-up.
Now, you can try to pull it several times to ensure that your sushi looks really tight and in a rod-shape.
Basically this is how it will look like - the end result.
Practice makes perfect.
What you see above is my first attempt on making sushi using this Sushi Maker.
It doesn't look that perfect of course.
However, you can improve its appearance when you are used to making sushi using the device.
There will be some rice getting out from the side because when you pull, you are applying pressure to the sushi - to make it into rod shape.
Thus, excessive pressure will cause the rice to blurt out from the sides.
All you need to do is just get a knife and push the rice slightly inside, so that it doesn't fall off.
Then, wet your knife and cut it.
Remember to use sharp knife.
Sharpen it if your knife is old and blunt.
You will have a hard time cutting the sushi if your knife is too old to function.
Once you are done, service with Japanese soy sauce or just eat it without the sauce.
It taste awesome, if you use the right materials and tools. =)
Second attempt.
Used Japanese sushi rice.
It looks better compared to the first attempt of using ordinary rice.
Third attempt.
Improving.
Gets better each time.
Practice makes perfect.
Tips:
If you use Japanese rice, it'll make the rolling process much easier because the rice will be soft and sticky, unlike ordinary rice, course, dry and hard.
If you use blunt knife to cut, your sushi will not have good shapes. You will face difficulty in cutting the Nori.
Benefits of 3-Steps Sushi Roller:
You don't have to worry whether the last step of spreading the rice covers the ingredients well or not because eventually when it is rolled up, everything will look perfect. See pictures. You won't know that actually when I made them, the rice doesn't spread well on the ingredients.
It's really very easy to use and I don't think anybody will have a problem using it. I find it pretty fast to make it too, compared to the traditional rolling mat because I really do not know how to use it.
The price is affordable and I think it's really a fun to use tool which everybody would be happy to experiment with.
It's really perfect for those amateur sushi makers like me. I fail at manual rolling but using this device, I can roll sushi like a professional. lol.
Disadvantages of 3-Steps Sushi Roller:
The sushi made each time is half of the size of the usual sushi we make using bamboo mat. You need to do 2 times to get 1 piece of Nori sheet length of sushi. Each time, you will get 4 sushi instead of 8 sushi.
The 3-Steps Sushi Roller is made of plastic. Honestly, I am not too convinced how long it can withstand the pressure of keep pulling to tighten the sushi.
Recommendation:
However, I am quite happy with this purchase because I think it is very useful. It allows me to make sushi the way I wanted it to look like. =) So, it's a great purchase for me. I'd definitely recommend people to buy this little tool if they plan to do sushi at home, but afraid that their sushi will turn out to have irregular shapes look. This little device will not disappoint you. =) And seriously, what people said that it is a waste of Nori sheet to use this-- well, I just find these people not using their brain to be innovative. When the Nori sheet length exceeds the white transparent sheet of the 3-Steps Sushi Roller, all you need to do is just do some simple adjustments.. Like what I have shown in the procedures above (photos). Then, you don't have to waste any nori because you can still roll them up and eat them all. So, I don't see why people find it a problem - Nori wastage. To me, they are just not using their brain to solve simple problems. = /