Showing posts with label Snack. Show all posts

Sunday, June 21, 2020

Durian Crepe

Durian Crepe 


CREPE LAYER: 
8 tablespoons all purpose flour
4 tablespoons tapioca flour (tepung ubi kayu)
2 tablespoons custard flour (tepung kastard)
2 tablespoons corn flour (tepung jagung)
2 tablespoons sugar 
2 eggs
2 teaspoons cooking oil
80ml full cream milk 
300ml water
2 teaspoons vanilla essence 
pandan leaves + water to substitute 300ml water / use yellow colouring

DURIAN CUSTARD FILLING:
400ml full cream milk 
2 tablespoons sugar
2 tablespoons custard flour 
200g durian flesh (without seeds of course) 
200g topping cream 

STEPS
  1. Mix milk, sugar and custard flour in a pot until all blended and no flour can be seen. 
  2. Cook with low fire until thickens slightly. 
  3. Remove from heat. Add in durian flesh. 
  4. Keep aside to be used later. (can be kept in fridge) 
  5. Mix liquid ingredients in a bowl. 
  6. Add in dry ingredients into the liquid ingredients bowl. 
  7. Mix well. Sieve. 
  8. Heat up nonstick pan. 
  9. Carry pan away from the fire. Pour 1 1/2 ladles of batter. Swirl the pan quickly to spread out evenly. 
  10. When it is cooked, you will see like bubbles trying pop out from the middle. 
  11. Overturn the crepe onto a plate.
  12. Leave to cool. 
  13. Whisk topping cream till 80% soft peaks for the soft creamy texture. 
  14. Wrap each cooled crepe with custard between 2 layers of whipped topping cream. Wrap in such direction: top and bottom, followed by left and right. 
  15. Keep in fridge to cool for a few hours before serving. 
NOTES:
  • Don't make it tooooo thin as it will be too soft to hold when you wrap the cream and custard in. 
  • Crepes won't stick together as long as you arrange them flat on top of one another. 
  • It is okay if your durian are unripe and has rubbery hard texture. When you make the custard, cook the durian flesh a little while and blend momentarily. It'll be fine. 
  • Extra custard can be kept in freezer for future use. Don't store too long though. 
Batter MUST be sieved 

Wrapped durian crepe puff 

Looks best when it is wrapped top and bottom, then only left and right to achieve the puffiness look


Tuesday, May 8, 2018

Beryl Dark Chocolate Candy

Beryl Dark Chocolate Candy 
I DIY this recipe myself


INGREDIENTS
1 cup of dark chocolate (I used Beryl 52%) 
Toasted whole almond nut

STEPS
  1. By using double boiling method, melt dark chocolate. 
  2. When the chocolate has melted, use a teaspoon to scoop a teaspoonful chocolate into the mold. 
  3. Put an almond in the middle. 
  4. Pour another teaspoonful of chocolate to cover the entire almond. 
  5. Put in the freezer for 20 minutes to freeze. 
  6. Remove chocolate from mold (best when it is cold and solid). 
  7. Store in container in the fridge to be enjoyed. 
NOTES
  • I can yield about 1 and a half tray of chocolate candies using the mold I'm using. So, maybe I can times 1.5 for this recipe to get 2 trays full. 
  • The chocolates don't stay in shape very well in room temperature for too long. Probably because I didn't temper the chocolates properly. I simply chose the shortcut by melting and reshaping.
  • The chocolates do taste more a less like outside sold chocolates. After all, I'm using the same Beryl brand chocolates. Just that it melts faster. Best serve immediately after taken out from fridge. It melts in your mouth like WOOOPS! =) 


I got shiny chocolate


Metal molds can make chocolates
Just need more patience when removing them from mold
They do work 


Almond Nougat

Almond Nougat 
牛乳糖


INGREDIENTS
150g marshmallow 
30g butter 
110g milk powder 
130g pre-roasted sliced almond (or any nuts) 

STEPS
  1. Melt butter in a pan. 
  2. Mix in marshmallow and melt with low fire. 
  3. Add in milk powder and mix well. Switch off the fire. 
  4. Add in the toasted nuts. Mix well. 
  5. Shape it in a container lined with plastic for easy removal.
  6. Remove it from the container and cut in candy bite size strips. 
  7. Store in air tight container in the fridge. 
The ingredients


This recipe helps me to finish up all the remaining marshmallow candy from my wedding last year =X

It's really pack with lots of milk powder and I think it's a good snack for me now since I'm carrying my little bean.. I need lots of calcium. 

The marshmallow is sweet enough. So, there's no need to add sugar or anything else. The sweetness is just nice. 

This is a SUPER EASY candy recipe for kids and adults. 

When it is stored in the fridge, it becomes hard. Leave in room temperature for a while before eating. It'll become chewy back. 

Friday, November 22, 2013

Lo Mai Kai 糯米鸡


Chinese Version 
1) 腌鸡肉
去骨鸡腿2个(切小块)
1.5汤匙(TBSPOON)耗油
1汤匙TBSPOON)麻油
1汤匙TBSPOON)酱油
1汤匙TBSPOON)绍兴酒
少许黑酱油
少许胡椒粉
少许盐


做法:将全部腌料把鸡肉拌均匀放进冰箱腌隔夜。

2)糯米
½ KG糯米(一定要浸隔夜)
1汤匙(TBSPOON)蒜米
1汤匙(TBSPOON)耗油
1匙(TBSPOON)麻油
1汤匙(TBSPOON)酱油
少许黑酱油
少许盐

做法:糯米沥干水,热一汤匙的油爆香蒜米然后加入糯米炒一炒。再加入调味料炒2-3分钟即可。

3)汤汁
500 ML水(不要吓倒,真的就那么多需要,我本身有再加一点点)
1汤匙(TBSPOON)耗油
1汤匙TBSPOON)麻油
2汤匙(TBSPOON)酱油
少许黑酱油
少许胡椒粉

做法:将刚才炒米的锅(不用洗),把调味料和水一起煮滚备用。(也可以把腌鸡肉剩下的汁一起煮滚)


最后最后最后-----〉把冬菇(浸过,切片;CL  TAN的食谱里没有这个)和 鸡肉铺在铁碗内再加入炒好的糯米。我有压平一下(因为我发现煮好后,那个SIZE有点涨一点点)。 然后,再把汤汁淋进米内(汤汁要改过米)。把已准备好的碗拿去蒸熟,大约50分钟(我本身只用了40分钟)。

English Version 
1) Marinate the chicken 
Boneless drumstick (chop into pieces) 
1.5 tablespoon of oyster sauce 
1 tablespoon of soy sauce 
1 tablespoon of shao xing wine
1 tablespoon of sesame oil
Little black thick soy sauce 
Little pepper 
Little salt 

Instruction: Marinate the chicken with all the materials listed above overnight. 

2) Glutinous rice 
1.5 kg of glutinous rice (must be soaked overnight) 
1 tablespoon of chopped garlic
1 tablespoon of oyster sauce 
1 tablespoon of soy sauce 
1 tablespoon of sesame oil 
Little black thick soy sauce 
Little salt 

Instruction: Drain the water from the glutinous rice. Heat up the garlic with slow fire (make sure it down't turn brown or else it will make the lo mai kai tastes bitter). Stir fry the glutinous rice for a while. Pour in the mixture of sauces into the glutinous rice and stir fry for another 2-3 minutes. 

3) Soup 
500 ml of water 
1 tablespoon of oyster sauce 
2 tablespoon of soy sauce 
1 tablespoon of sesame oil 
Little black thick soy sauce 
Little pepper 

Instruction: Use the wok to stir the glutinous rice earlier. Heat up the mixture of sauces to make them turn to soup. You can also put in the remaining marinated sauces into the mixture. Turn off the fire when it is boiled.

4) Assemble 
Simmer mushrooms into hot water. When they turn soft, take them out from the water to be cut into slices. Place mushroom and marinated chicken slices in the bottom of the bowl. Fill it with glutinous rice. Lastly, pour the soup into the bowl. Make sure the soup covers the rice. Tips to make your lo mai kai to be moist: You may add some soup 5 minutes before you switch off the fire. After assembling all the ingredients, put the bowls to be steamed for 40-50 minutes. 

One night before you start cooking. 

View from left to right. 
* Do not stir fry your garlic like mine - I over fried it. 

View from left to right. 

Wednesday, January 16, 2013

Making Dorayaki

I have been wanting to make this ever since I saw the recipe at somewhere else that day. I couldn't remember where I got it-- I jotted the recipe on a piece of rough paper and kept it at a corner. As I was not feeling too well last week, I dare not to cook anything too oily. I am feeling better now and here you go - Dorayaki! 

It's best known as 銅鑼焼き or Doraemon's cake/cookie/biscuit. 

. . . . . 

D-O-R-A-YA-KI!

Dorayaki Recipe 
Servings: Can make about 10 Dorayaki using this recipe.

Preparation Time: 20 - 40 minutes. Suitable for breakfast / tea break snack. 


Ingredients: 
100 gm of wheat flour (tepung gandum) 
1/2 tea spoon of baking soda 
60 gm fine white sugar (grind the sugar into powder if you only have granulated sugar at home) 
2 tablespoons of honey (I used pure honey) 
1/2 tablespoon of cooking oil (I used Canola cooking oil) 
1/2 tea spoon of vanilla extract essence 
1 tablespoon of milk (I used Nestle full cream milk) *optional* 

Tools: 
Non-stick frying pan 
Electric mixer / whisk 
Spoons 
Big bowl
Chinese soup-drinking spoon 

Steps: 
  1. Use the electric mixer to beat eggs and sugar until the mixture turns light and fluffy (in BM: kembang). I used high speed and beat the mixture for about 10 minutes.  
  2. Put the electric mixer a side. You won't need it anymore. Then, put in honey, oil and vanilla extract into the egg-sugar mixture. Stir well using a spoon. 
  3. Put in baking soda and flour into the mixture. Use scoop and push method (in BM: kaup balik). 
  4. If your batter is too thick, you can put in some milk. In my case, I put about 1 tablespoon of milk. 
  5. Get your non-stick frying pan on the stove with low fire. *very important: do not use high fire* 
  6. Use the Chinese soup-drinking spoon as a rough measurement to scoop the batter and put it into the frying pan to cook. 
  7. Flip the round Dorayaki only when you notice there's some bubble-liked texture on the Dorayaki surface which is facing you. This is an indicator that it's time to flip over. See images below for better understanding. 
  8. Serve with Nutella chocolate paste or other paste while it's hot. Dorayaki is done. =) 

Reminders: 
  • Do not try to skip the first step - beat the egg and sugar using electric mixer until the mixture turns fluffy. It will affect the overall taste of the Dorayaki.
  • Do not put oil in the pan while you are cooking the Dorayaki. They already contain oil. You will have really oily Dorayaki if you put more oil to cook them. 
  • Do not ever use high fire. Use really low fire and cook them slowly. Be patient. 
  • Flip over the Dorayaki only when you see bubble-liked texture on its surface. 
  • Don't make your batter too thick/watery. Get a moderate consistency. 
  • Do not use granulated course sugar to beat with the eggs. I am afraid you will be able to bite the sugar in the Dorayaki. It is not going to taste good. Grind your sugar if you don't have fine sugar. 

Images Taken During The Process of Making Dorayaki: 
I forget to put in the vanilla extract. 
Basically, those are the needed stuff to make Dorayaki.
You can easily find these materials at home. 


It's a mistake. 
I should have pour the eggs and powdered sugar into the rice cooker pot. 
I posted this image to show the first step: sugar + egg 


Beat the egg and sugar with an electric mixer. 


After beating the mixture for about 10 minutes, this is what you'll see - 
Light and fluffy mixture. 


Put in honey, oil and vanilla. 
Then, use a spoon to mix the mixture well. 


Put in baking soda and flour. 
Mix well using a spoon. 


This is how your batter should look like after mixing everything together. 
The consistency of the batter should not be too thick, or else your Dorayaki will taste very hard. 
But, you can't make it too watery too. 
Just get a moderate-consistency will do.  
I did add little bit of milk into my batter.


Frying pan with low fire. 
Remember, do not use high fire. 
You don't have to prior heat up the pan before cooking. 
Make sure, your fire is really low or else you will burn your Dorayaki. 
And 1 more thing: you DO NOT have to put any oil on the pan before cooking them. 


These are the first 3 round Dorayaki that I placed in the pan. 
I dare not put many at first because I want to make sure all things are right. 
To make round shape, all you need to do is just pour the batter at the center-- 
It'll spread into a circle shape if the consistency is right. 
You can adjust it slightly using your spatula if you find the shape isn't looking too good.


So you see, my non-stick pan has some problem lately. 
I have some problem flipping them over. 
Thus, you can see some dented area at the corner of each Dorayaki. 
However, I slowly pick up the technique when I continue making more. 
Tips: Usually, the first batch of every stuff will not look too good. =) 


This is the hint I talked about earlier. 
Notice there's bubble liked texture on the surface? 
This is an indicator to tell that the other surface of the Dorayaki is cooked and it's time to flip over. 


See...? 
This is its back. 
It's cooked in beautiful beige-brown colour. 
To me, beautifully cooked means beige/light brown and not dark brown--- 
Dark brown colour looks like chao-da (over-burnt) to me. 


These are the 3 Dorayaki with the best look. 
Some were eaten by Dad when I'm cooking them. 


Eat with Nutella chocolate paste. 
It tastes great! 


I just wanted to show how the Dorayaki looks like when you put 2 together with paste at the center.


And there you go- 
Three paired-up Dorayaki! 


Sunday, June 26, 2011

How to make Ju Cheong Fun?

. . . . S T A T U S
Mood : =)

Every Sunday I'm not working. So, I'm TOO free and I have nothing to do. This week is the same too. I am not happy when I need to work but when I don't need to go to work, I'm not happy too. = = Tsk.

Anyway, today I made Ju Cheong Fun 猪肠粉. From the research I made online, it belongs to the Cantonese delicacy. ; ) If you translate  Ju Cheong Fun directly into English, it will be "Pig's Intestine". Bwahahaha.. It's just the name. Maybe it's because this dish really looks like intestine. Ha- It tastes good anyway!

The reason I decide to check out how to do Ju Cheong Fun is because I'm really in love with this dim sum. Mom doesn't buy it often and I really love to eat it. So, I think it is better if I learn how to make it than waiting for people to buy for me. ; ) Hehehee.. Ju Cheong Fun is nice to eat with tao ki and fish balls! ; )))


Ju Cheong Fun 猪肠粉
Difficulty level : 2/10
Servings : 2-3 
Duration : 20 minutes 


Ingredients
230ml room temperature water
70g sieved rice flour
1tbsp wheat starch I do not have this. I ignored this ingredient. If you have, then put.
1tbsp corn starch
1/4 tsp salt
3tbsp oil
Some oil for greasing 
Filing
Chopped spring onion
Chopped dried shrimps (xia mi 虾米)
For steaming
Water
Sauce
(i) Black sauce 
1 tsp sugar
2 tsp hot water
2 tsp soy sauce
1 tsp sesame oil 
(ii) Chili sauce
1 tsp sugar
1-2 tsp hot water
1 tsp Maggie Chili ketchup 


Utensils
Fork 
Spoon
Bowl 
2 rectangular containers
Scraper 
Brush
Knife
Chopping board 
Wok and a metal piece for steaming / steamer 
Sifter 
Kitchen measuring tool


Be careful!
  1. You MUST use rice flour. No other flour is able to be substituted. 
  2. Make sure you put enough oil. If not, the layer of batter might stick on the container's surface.
  3. If you do not have what starch, do not try to replace it with wheat flour (which normally most of our kitchen has). From what I read on the Internet, wheat starch and wheat flour are NOT interchangeable. This means that you CANNOT substitute wheat starch with wheat flour and vice-versa. 
  4. Do not use tissue paper to wipe the oil on the Ju Cheong Fun. It will stick on the Ju Cheong Fun. 
  5. Do not shake the container of batter. Put it gently into the steamer and close it nicely. 
  6. Practice makes perfect if you are aiming to do transparent-thin Ju Cheong Fun. I have yet to reach that level! This is my first attempt. 


Let's start the work!
1. Prepare the ingredients.

Remember. 
Use ONLY rice flour, Tepung Beras. 


2. Get your steamer ready.

That's the metal plate that I'm talking about.
I don't have a steamer so I use a wok and a metal piece.
Fill half of the wok with water. 
Add a little salt into the water if you want the water to be boiled faster.
My house is using organic salt, so I'm not wasting it on this. 
Boil the water while we prepare the other ingredients. 
You don't have to use high fire. 
Just a moderate fire to get it to a boil is good enough.


 3. Mix the ingredients.

Remember to sift the rice flour. 
I always do it at the sink after a few times dealing with sifting flour job. 
This is to lessen the cleaning work. 
I don't like cleaning and sifting always cause messiness to the table and floor. 
So, do it at the sink is convenient. 
Of course, make sure there is no water dripping near your sink.
I usually sift the flour that is measured directly into the big bowl. 


Don't put your sifter a side yet. 
Use it back to sift the corn starch.
I do not have wheat starch at home. 
So I skipped that.
It turned out OK. 
I'm not sure though is wheat starch a must in making Ju Cheong Fun. 


There you go..
Both rice flour and corn starch are in the big bowl. 


4. Get the water in to turn powder to batter.

Now, add in the measured 230 ml water into the mixture of powder.


Use a whisk if you have any. 
My house doesn't have whisk. 
So, I use the fork.
It's obviously not going to work as efficient as a whisk but it is good enough to complete the task.
Blend the mixture of powder and water well with the fork so that the batter does not contain any lumps. 
Your mixture should be in batter form. 
Thin batter = watery liked.


5. Get the oil and salt into the batter. 

3 tablespoon of oil. 
I know I am not using the right measuring tool.
I saw it wrongly at first.
I thought it meant 3 teaspoon of oil.
I then added a few spoons more to make it roughly 3 tablespoon of oil.


Then add in 1/4 teaspoon of salt. 


Then, mix everything well. 
Make sure everything is in batter form. 
No powder is left underneath the batter. 
Use a spoon to scrape the bottom of the batter. 
We do not want any lumps in our Ju Cheong Fun.


6. FILING: Chop the dried shrimps(虾米)and spring onion. 

First, soak the dried shrimps in a bowl of water because they are hard.


After soaking for about 15 minutes, the shrimps will turn softer than before. 
Bring them to the chopping board and chop them with a knife.
This is just to make the shrimps smaller. 
You need not chop it till TOO FINE. 
Cube size is the best.


Next, chop the spring onion. 

Put the chopped dried shrimps and spring onion a side while we prepare the Ju Cheong Fun.


7. Grease the containers. 

Get a brush.
Not a toothbrush.
This mini brush can be bought at any grocery/baking shop.


Some oil.
Just a little. 
Around 1 teaspoon. 


Dip the tip of the brush into the bowl of oil.
Then do what?


Grease the container!
Just brush the bottom of the container. 
You don't have to brush the side because you won't need to. 
Just look at where my brush is brushing.


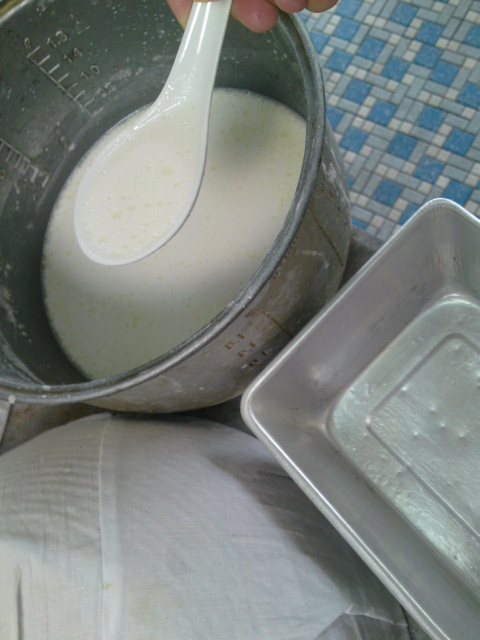
8. Get the batter into the container.

I used this drinking soup spoon for I'm not sure how much to put into the container at first.
I put 3 spoons of that spoon size of batter into the container. 
It turned out a little thick (not as thin as the outside selling ones)
So maybe I should have just put 2 spoons.
I put 3 spoons at first cuz it looked a little TOO thin. 


That is how much 1 spoon is. 
The aim is to cover the rectangular surface with a thin coated layer of batter.


9. Sprinkle the filing on the layer of batter. 

I learned my lesson.
It is better if you put the container of batter to the steamer,
THEN only you sprinkle the filing (chopped dried shrimps and spring onion). 
It's difficult to explain why I ask you to do this but it is just my advice/point of view.

Steam the Ju Cheong Fun for about 5 - 7 minutes, depending on the thickness and material of the tray you are using. 
If you're using metal container, obviously it's going to be heated up faster.
Check by poking the Ju Cheong Fun with a fork. 
If nothing stain on the fork, then it should be done. 
You can get it out from the steamer. 

Before I forget, please remember to cover it when you are steaming. 
You don't leave the food you want to steam in an open air when you intend to steam it.

DO NOT shake the container/wok because you are going to make the liquid batter into a solid layer. 
If you were to shake it, the layer will not turn out good in shape. 

Put the container of batter into the steamer slowly and carefully cover it.


10. Prepare the sauce.
While we're waiting for the first container of Ju Cheong Fun to be cooked.. 
BEWARE : Follow the sequence. 

(I) Black sauce
Add 1 teaspoon of sugar into a bowl. 
Then add in 2 teaspoon of hot water. 

After adding these two ingredients, mix the mixture well.
Do not add other stuff yet. 
I repeat, DO NOT add other stuff yet.
Dissolve the mixture first because sugar needs to be dissolved earlier.

I made a mistake here by adding all ingredients at once.
The sugar did not dissolve after adding the oil into the mixture.
Hence, I had to put in some hot water to let it dissolve. 
Do not repeat my mistake.


After the sugar in the mixture has completely dissolved.. 

Just to show you.. This is soy sauce. 
It's also known as Kicap soya.


Add in 2 teaspoon of soy sauce.
And 1 teaspoon of sesame oil.
I did not manage to snap the sesame oil photo. =X


Mix the mixture well. 
Then the black sauce is done.


(II) Chili Sauce
I didn't snap the photo one by one in making this chili sauce because I thought it was an experiment at first.
I am not sure if it is going to work.
The recipe asks for sweet Chili and I do not have any.
So I decided to make one myself.

To make this Chili sauce, I use :
1 tsp sugar dissolved in 1-2 tsp hot water + 1 tsp Maggie Chili ketchup 
It works miraculously! XD


11. Get the second container ready to be cooked after the first container is out.

The second container of Ju Cheong Fun.
Just do the same thing like above to prepare the second container. 
It's easy, isn't it?

The reason I use 2 containers here is because I can save the gas. 
I do not have to waste time waiting if I have 2 containers. 


12. Scrape the Ju Cheong Fun up! 
The hard part as well as the fun part! ; )

After you get the container of Ju Cheong Fun out from the steamer, 
do let it cool down for 2 minutes. 
Then use a scrapper to make a cut on the border of the rectangular Ju Cheong Fun.
This is to make the Ju Cheong Fun easier to be scraped up. 
If you realize that it is difficult to scrape the Ju Cheong Fun up, apply some oil at the tip of the scraper.
TIPS: Oil helps in all stubborn stickiness in cooking. ;)

Lift the edge first, then slowly roll the Ju Cheong Fun up.

Then you will eventually get a long roll of Ju Cheong Fun! ; )


13. Cut and done.
 The first twos. Ha- I made a little mistake on the first one. 
I accidentally shake the wok of water while I'm steaming it.
That's why it is a little thick when I roll it. ;P

You can use the scraper to cut the Ju Cheong Fun. 
You need not use a knife here.
Save the unnecessary cleaning job! ; )

Do not be too worry if you realize your Ju Cheong Fun is a little oily.
It will not taste that oily after all when it is in your mouth accompanied with the sauce. ;)

Do not use tissue paper to wipe off the oil. 
It's going to stick on it!


The second Ju Cheong Fun that I just rolled up. 
; ) I feel so proud and contented! 
Haaaa...


14. Pour the sauce over.

Pour over the Chili sauce first.
Then the black sauce. 


They are ready to be served! ; )


Eat it while it is still hot! 
; )


Enjoy! 


A last look of it before they are entering into my stomach!
Bwahahahahaha......


It's so delicious!
The first batch of Ju Cheong Fun finishing~


Closer look.


Mini Ju Cheong Fun

Mom said the first batch of Ju Cheong Fun is thick.
So I made it thinner by reducing its thickness size. 
; ) They obviously look thinner and smaller, aren't they?


Yum yum yum..
My Ju Cheung Fun indeed is  not as THIN as the ones people selling outside..
However, they are qualified and tasty! 
XD Try it out some day!
It's EASY!

My sauce is GOOD!


Serve Ju Cheong Fun with a cup of chill Soya bean drink, 
JENGGGGGG! 


XD One afternoon was over just like that.